Print or send barcodes and QR codes with
BarcodeChecker, Excel & Word
- for tickets, name tags, invitations -
If you have an Excel list with names for which you want to print tickets, name tags or invitations with barcodes, you can use the mail merge feature of Microsoft Word to print or send these documents.

1.) Create barcodes as text or images with TicketCreator/BarcodeChecker.
2.) Use Word and Excel to:
- Print documents with barcodes
- Send e-mails with barcode images (no additional software required)
- Send e-mails with PDF attachments (requires Outlook and Adobe Acrobat or Merge Tools)
3.) Scan the barcodes at the entrance with BarcodeChecker to reject copied tickets or register the participants.
Create barcodes with BarcodeChecker
1.)
![]() Start BarcodeChecker and select the menu
Create barcodes for export.
Start BarcodeChecker and select the menu
Create barcodes for export.
2.)
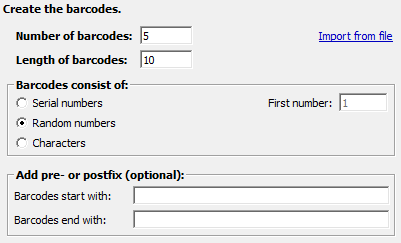
Create barcodes with serial numbers, random numbers, or characters, or import value from an Excel file.
3.)

Select, whether the barcodes should be saved as text or images.
- Barcodes as text: Barcode texts can be used easier than barcode images and are ideal for printing or PDFs. They cannot be used for e-mails because the require barcode fonts that are only available on PCs with TicketCreator. The e-mail recipients do not have these fonts.
- Barcodes as images: Barcode images are more difficult than barcode texts, but they can be used for e-mails.
4.)
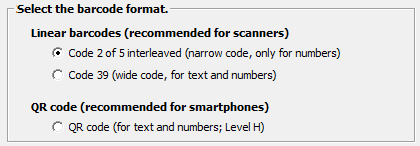
Then select the barcode type. You can create linear barcodes in the formats Code Interleaved 2 of 5 and Code 39, which can be read with all scanners and smartphones, or QR codes, which can be read with smartphones and 2D scanners.
5.) Show the barcodes as texts in Excel, or save the barcodes as images.
Print barcodes or send them by e-mail
With the Mail-Merge feature of Microsoft Word you can:
Barcodes as text: Print barcodes
Barcodes as text: Print barcodes
6.)
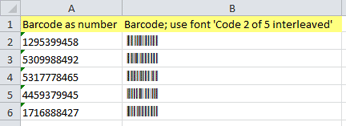
The barcodes are now shown in Microsoft Excel.
7.) 
Copy the barcodes into your Excel list with the names and save the file.
8.) 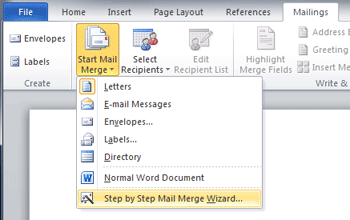
Start Microsoft Word, select the Mailings tab and click the Step by Step Mail Merge Wizard.
9.) 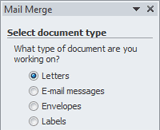
Select the appropriate document type and click Next: Starting document to continue.
10.) 
Select Use an existing list, click Browse and open the Excel file with the names and barcodes.
11.) 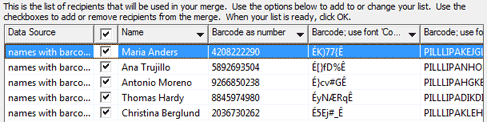
The imported value from the Excel file are shown and you can select the recipients. When you're done, click OK to close the dialog box.
12.) 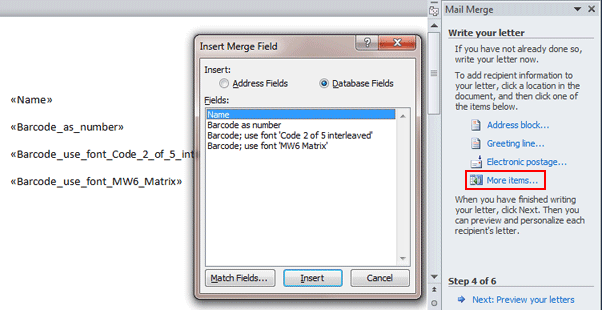
Write your document and click More items to insert the names and barcodes. Click Next: Preview to preview the document.
13.)
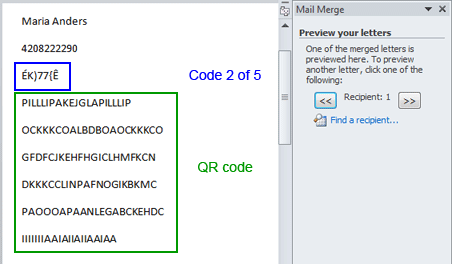
One of the merged document is now shown. You can switch between the recipients with the appropriate buttons.
Note: The barcodes are not yet formatted with the required font and hence shown as text.
14.)
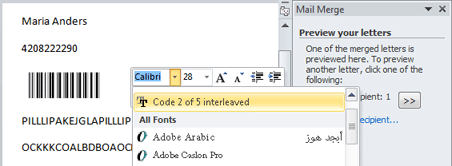
Format the Code 2 of 5 barcode with the font Code 2 of 5 interleaved.
15.)
Format the QR code with the font MW6 Matrix, which is shown in the font list as two dots.
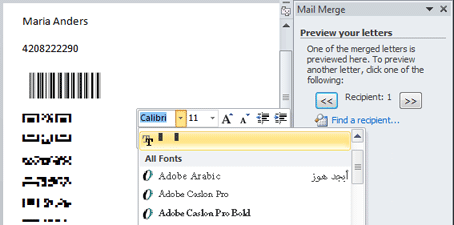
16.)
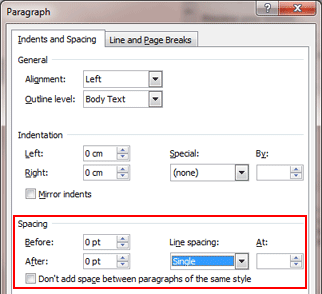
For QR codes you must change the Paragraph settings to Spacing before and after: 0 pt and Line spacing: Single to remove the gaps.
17.)
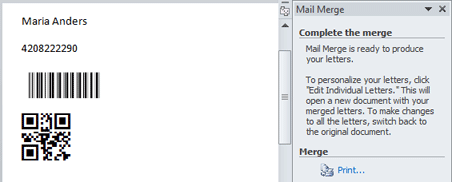
Done. Now you can print the merged documents with the barcodes.
Barcodes as text: Send e-mails with barcodes in PDF attachments
Barcodes as text: Send e-mails with barcodes in PDF attachments
You have two options to send barcode tickets automatically by e-mail.
- This section explains how use barcodes as text to
send e-mails with barcodes in PDF attachements. This requires
an Excel file with e-mail addresses, Outlook and Acrobat Professional or Merge Tools.
Attention! You must send the document with the barcodes as PDF attachment! You cannot send the text as email with Word, because the recipients do not have the barcode font and will therefore not be able to read the barcode in the e-mail. However, they can read and print the barcode in a PDF.
- Alternatively, you can use barcodes as images to send e-mails with barcode in the message. This does not require additional software. See next section.
Acrobat Professional
If you have Acrobat Professional (not the free Acrobat Reader) it installs an add-in in Word, which you can use to send mail-merged documents as PDF attachments.
A.) Perform steps 1-15 as above.
B.)

Press 'Merge to Acrobat PDF' in the mailings tab and send the e-mails.
Merge Tools
An alternative to send e-mails with PDF attachments is Doug Robbins' Merge Tools for Office.
A.) Download the Merge Tools file and follow the instructions (see also this video).
B.) Move Merge Tools file in the Word Startup folder.
C.)
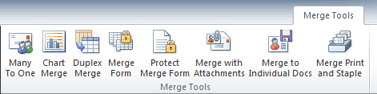
After placing the Merge Tools file in the Word Startup folder the Merge Tools tab is shown.
D.) Create a mail merge document as described in steps 1-15 above. Use the document type 'letter', not 'E-mail message'. Save the document.
E.)

Switch to the Merge Tools-tab and select 'Merge with Attachments'.
F.)
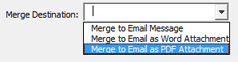
Select 'Merge to Email as PDF Attachment'.
G.)
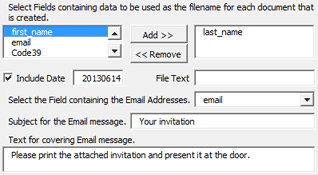
Select fields containing data to be used as filenames and the field containing the email addresses.
H.) Press 'Continue' to send the e-mails with Outlook.
Barcodes as images: Send e-mails with barcodes in message
Barcodes as images: Send e-mails with barcodes in message
If you want to send e-mails with barcodes with the mail merge feature of Word you must insert the barcodes as images. Unfortunately, this feature it is difficult to use.
Follow the description exactly.
6.)
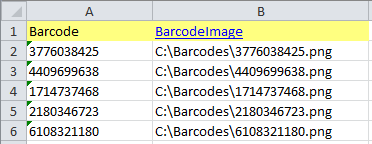
Open the file with the barcodes and the file names of the BarcodeImages im Microsoft Excel.
7.)

Copy the barcode into your Excel file with the names and e-mail addresses and save the file.
8.) Open Word.
9.) Click in the tab Mailing on Start Mail Merge and select E-Mail Messages.
10.) Click on Select Recipients and Use an Existing List, then select the Excel file.
11.) Press Ctrl + F9. This inserts a {}.
Do not use the { and } keys but only Ctrl + F9!
![]()
12.) Type INCLUDEPICTURE after the {.
![]()
13.) Press again Ctrl + F9 to enter a {} after the INCLUDEPICTURE.
![]()
14.) Type IF TRUE after the {.
![]()
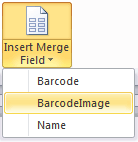
15.) Press Insert Merge Field and select
BarcodeImage.
![]()
16.) Type \d before the last }.
![]()
17.) Press Preview Results.
18.) Press Ctrl + A. Then press F9. This updates the images.
19.) If necessary, press Alt + F9 to show the image. Press Alt + F9 again to show the field text again.
Important: If the image is not shown you must press first Ctrl + A and then F9. If necessary, press Alt + F9.
Use BarcodeChecker to scan and check the barcodes
1.)
![]() Start BarcodeChecker
and select 'Scan tickets' or 'Start server'.
Start BarcodeChecker
and select 'Scan tickets' or 'Start server'.
2.)
Select 'Create BarcodeChecker file for other barcodes'.
3.)
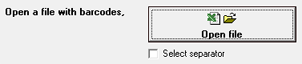
Open the Excel file with the barcodes, select the field with the barcode as text
or number, and save the BarcodeChecker file.
4.) Scan the barcodes at the door with a barcode scanner, a web cam, an Android phone, or an iPhone/iPad. See details.